
Getting a radio talking to WSJT-X comes down to two separate conversations happening at once. The first is control — WSJT-X needs to tell the rig what frequency to sit on and when to transmit. That happens over a serial (CAT) connection. The second is audio — the actual FT8 tones have to flow from your computer into the radio’s mic input and back out from the radio’s receiver into the computer. Get both of those pointed at the right places and you’re on the air.
On the Yaesu FT-710, both of those usually ride over a single USB cable, which keeps things simple. The rest of this guide walks you through it one box at a time: the CAT settings, the audio routing, the PTT method, and a quick test to confirm it’s all working before you key up for real.
If you’d rather not configure the FT8 calling sequence by hand every time, Hamilton Auto FT8 automates the full contact exchange inside WSJT-X once this setup is done — but you need WSJT-X talking to the radio first, which is exactly what we’re doing here.
What you’ll need
- Your Yaesu FT-710 connected to the computer with its USB cable.
- The radio’s USB driver installed (so the computer sees a COM/serial port for it).
- WSJT-X installed and opened at least once.
- A few minutes and your radio’s menu within reach.
Before you start: Yaesu FT-710 notes
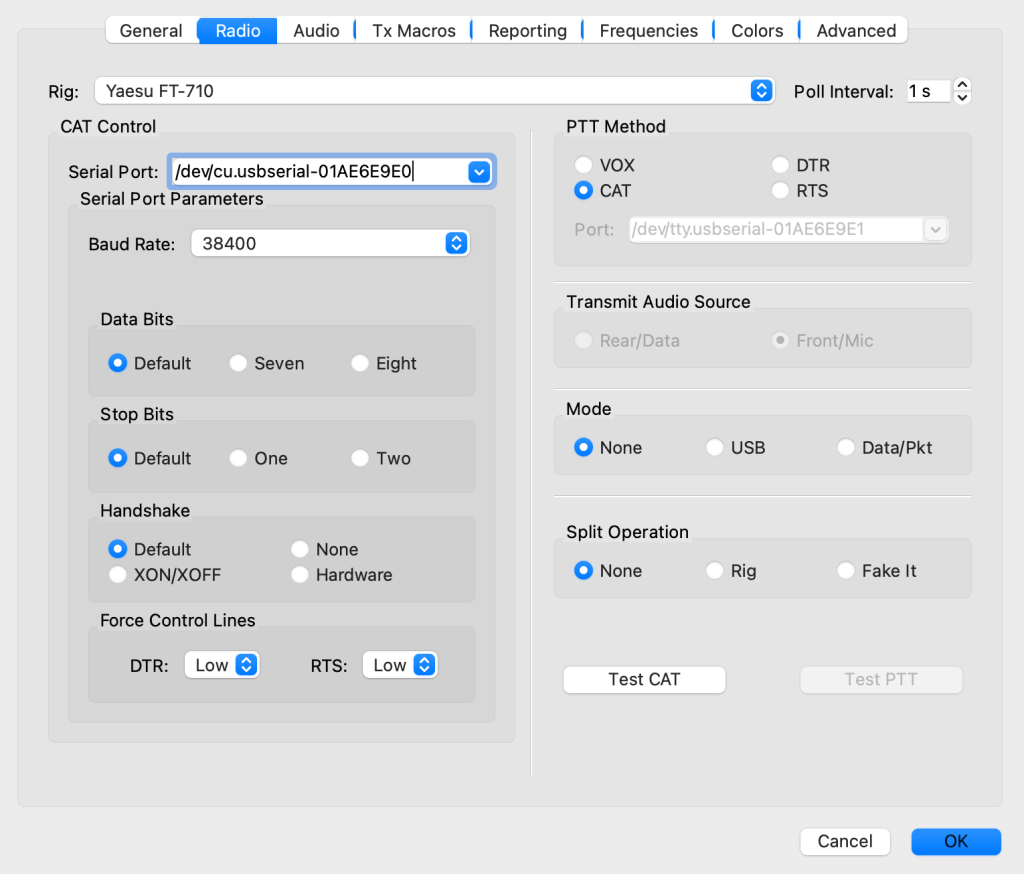
Force Control Lines use DTR: LOW and RST: LOW as well
Step-by-step: WSJT-X setup for the Yaesu FT-710
Step 1: Find the radio’s COM port
With the Yaesu FT-710 plugged in and powered on, you need to know which serial port the computer assigned it. On Windows, open Device Manager → Ports (COM & LPT) and note the COM number (for example, COM5). On macOS or Linux, the port shows up as something like /dev/cu.usbserial-XXXX or /dev/ttyUSB0. Jot it down — you’ll need it in a moment.
Step 2: Open WSJT-X radio settings
In WSJT-X, go to File → Settings → Radio. This is where you tell WSJT-X how to control the Yaesu FT-710.
Step 3: Set the rig and serial parameters
Set these values to match the Yaesu FT-710:
| Rig | Yaesu FT-710 |
|---|---|
| Serial Port | the COM port you found in step 1 |
| Baud Rate | 38400 |
| Data Bits | Default |
| Stop Bits | Default |
| Handshake | Default |
| Poll Interval | 1 s |
The baud rate especially has to match what the radio’s own menu is set to — if they disagree, CAT control silently fails. We’ll confirm that in the test step.
Step 4: Set the PTT method
Still on the Radio tab, set PTT Method to CAT. Use the same port as CAT control. This is how WSJT-X tells the radio to start transmitting when it’s time to send.
Step 5: Set the audio devices
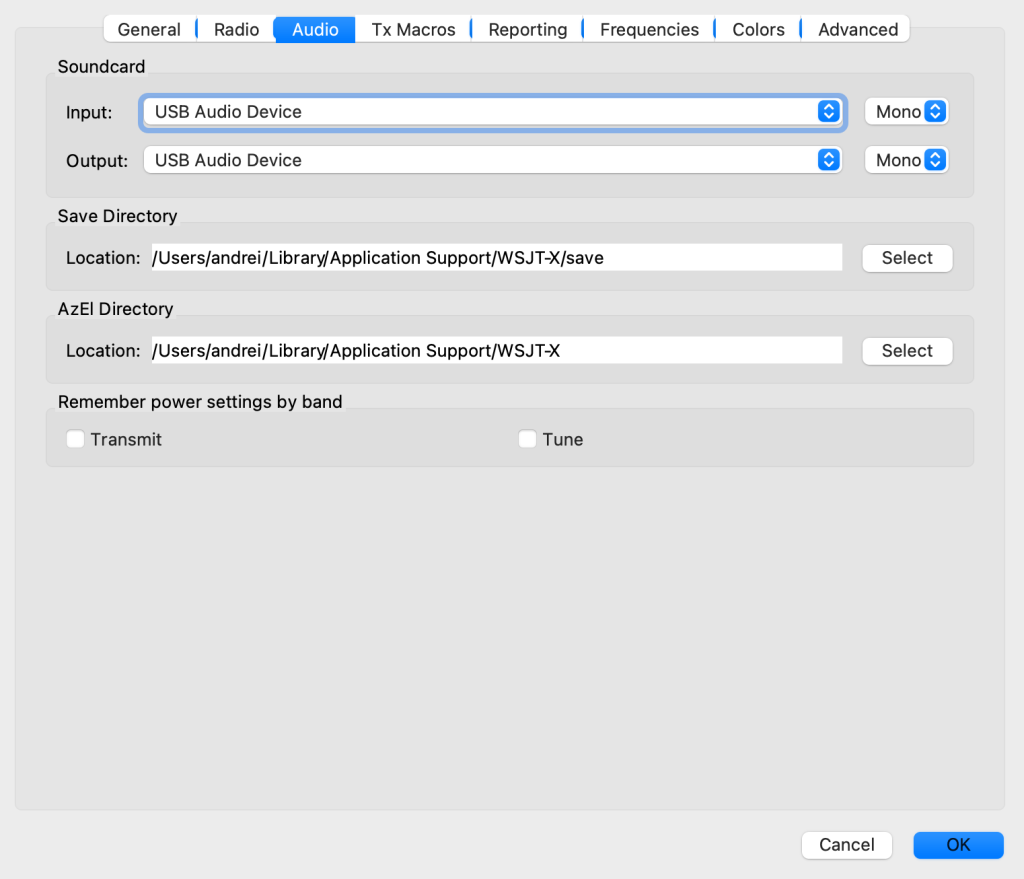
Switch to the Audio tab. Set Input (Soundcard In) and Output (Soundcard Out) to the Yaesu FT-710’s USB audio codec — it usually shows up with the radio’s name or “USB Audio CODEC” in it. Input is what the radio hears from the band; Output is the FT8 tones going into the radio.
Step 6: Set the mode on the radio
Put the Yaesu FT-710 into its data/USB mode (the one that routes USB audio to the transmitter — often labeled DATA-USB, PKT, or DIG depending on the rig). FT8 is an upper-sideband data mode, so you want the data variant of USB, not plain SSB voice.
Confirm it works
Time to confirm it works. Back in WSJT-X settings on the Radio tab, click Test CAT. If the button turns green, WSJT-X is talking to the Yaesu FT-710 — frequency changes in WSJT-X should now move the radio’s dial. If it stays red, the baud rate, COM port, or rig selection doesn’t match; revisit step 3.
Next, click Test PTT. The radio should switch to transmit (watch for the TX indicator) without actually putting out power into a band, since no tone is playing yet. Click it again to release.
Finally, close settings and watch the waterfall. On a live band you should see FT8 signals marching across it. Decode a few, and you’re ready to make contacts.
Troubleshooting the Yaesu FT-710
| Test CAT stays red | Baud rate mismatch is the usual cause — make sure WSJT-X and the Yaesu FT-710’s menu agree (we set WSJT-X to 38400). Also confirm you picked the right COM port and that nothing else (like another logging program) is holding the port open. |
|---|---|
| CAT works but no audio / no decodes | The audio device is wrong. Double-check the Input and Output on the Audio tab point at the Yaesu FT-710’s USB codec, not your computer’s built-in speakers or mic. Also verify the radio is in its data/USB mode. |
| It transmits but puts out no power | The radio isn’t getting audio, or drive/mic gain for the data port is at zero. Raise the data input level in the radio menu and check the WSJT-X Pwr slider isn’t at the bottom. |
| Frequency in WSJT-X and the radio don’t match | CAT is half-working. Reselect the exact rig string (Yaesu FT-710) in WSJT-X and re-run Test CAT. |
Frequently asked questions
Do I need a separate sound card or interface for the Yaesu FT-710?
No. The Yaesu FT-710 handles both CAT control and audio over its single USB connection, so no external interface is required for FT8.
What baud rate should I use for the Yaesu FT-710?
This guide uses 38400, which matches the value you set in the radio’s own menu. The two must agree for CAT control to work.
Can I use this setup with Hamilton Auto FT8?
Yes. Once WSJT-X is controlling the Yaesu FT-710 and decoding FT8, Hamilton Auto FT8 runs on top of WSJT-X to automate the full calling and logging sequence.
Why isn’t my radio transmitting on FT8?
Almost always a PTT or audio routing issue. Confirm PTT Method is set to CAT, the radio is in data/USB mode, and the audio output device is the radio’s USB codec.
Next steps
With WSJT-X controlling your Yaesu FT-710, you’re ready to work FT8. If you want the calling, replying, and logging handled automatically, take a look at Hamilton Auto FT8 — it drives the whole contact sequence inside WSJT-X for you. 73!